|
| |
|
| |
|
|


|
|
TCHS 4O 2000 [4o's nonsense] alvinny [2] - csq - edchong jenming - joseph - law meepok - mingqi - pea pengkian [2] - qwergopot - woof xinghao - zhengyu HCJC 01S60 [understated sixzero] andy - edwin - jack jiaqi - peter - rex serena SAF 21SA khenghui - jiaming - jinrui [2] ritchie - vicknesh - zhenhao Others Lwei [2] - shaowei - website links - Alien Loves Predator BloggerSG Cute Overload! Cyanide and Happiness Daily Bunny Hamleto Hattrick Magic: The Gathering The Onion The Order of the Stick Perry Bible Fellowship PvP Online Soccernet Sluggy Freelance The Students' Sketchpad Talk Rock Talking Cock.com Tom the Dancing Bug Wikipedia Wulffmorgenthaler |
|
bert's blog v1.21 Powered by glolg Programmed with Perl 5.6.1 on Apache/1.3.27 (Red Hat Linux) best viewed at 1024 x 768 resolution on Internet Explorer 6.0+ or Mozilla Firefox 1.5+ entry views: 398 today's page views: 213 (32 mobile) all-time page views: 3385879 most viewed entry: 18739 views most commented entry: 14 comments number of entries: 1226 page created Thu Jun 19, 2025 19:02:08 |
|
- tagcloud - academics [70] art [8] changelog [49] current events [36] cute stuff [12] gaming [11] music [8] outings [16] philosophy [10] poetry [4] programming [15] rants [5] reviews [8] sport [37] travel [19] work [3] miscellaneous [75] |
|
- category tags - academics art changelog current events cute stuff gaming miscellaneous music outings philosophy poetry programming rants reviews sport travel work tags in total: 386 |

| ||
|
- JFK's Inaugural Address (was going pretty well till the CIA did him in) Increasing recognition of Cold War II, or something functionally similar enough to it, has perhaps renewed interest in a particularly-relevant board game (as the coronavirus did for Pandemic); Twilight Struggle is arguably on another level altogether, though, having been ranked as the best board game available on BoardGameGeek for years on end, before finally getting bumped by Pandemic Legacy in 2016 (again coincidentally reflecting reality?). It's currently as low as fourteenth, still no mean feat considering that BoardGameGeek covers over a hundred thousand games in its database. As its name suggests, Twilight Struggle is themed around Cold War I (which is declared to have lasted from 1945-1989 on the box). Amongst the most well-known board games, the closest resemblance would probably be with Risk, in the sense that both games represent global conquest over a map of the world, with tokens representing a player's control over various territories, and dice and cards involved in wresting said control from competitors. However, where Risk deals in army units with little recourse to realism, Twilight Struggle begins by recreating the positions of the two (and only two) main players at the beginning of Cold War I, basically a standoff in Europe. Fittingly for such a highly-regarded game, Twilight Struggle has a surfeit of teaching and introductory guides on the Internet, with another option being an interactive tutorial in the computer version (as obtained on Steam, on which I've gotten several games under my belt over the past weeks) - which also conveniently deals with all the book-keeping and enforcement of rules. Moreover, the official rulebook is freely available online, which might be entirely sufficient for skilled textbook learners. While all of the above-linked resources are excellent, I'll try to work a narrative for it here: 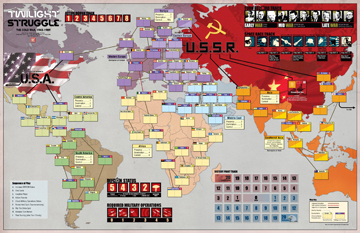 Game map in full (click for full-sized version) (Source: r/MapPorn) It begins with the map, as it so often does, with the various relevant countries (key exceptions being America and the U.S.S.R., who are assumed to control their home territories throughout, and China - represented by its own special card, of which more later) in the Game being represented by a box (or space) as follows:  Eastern Europe & the Middle East, always exciting! Taking Bulgaria as an example, we see that its box has its flag in the top left, its name in the middle, and a number (3) in a small yellow box at the top right. This is a country's Stability Number, which represents how generally resistant the country is to external influence (and in practice, coups and such). The United Kingdom has a Stability of 5, for instance, most of Europe has a Stability of at least 3, with a sprinkling of 1-Stability countries scattered about Central America, Southeast Asia, and most prevalently Africa, reflecting reality. Unlike Risk, it is expected that the two players/superpowers can exert Influence (recall the Liar Game exposition) within a country simultaneously (as Singapore may now be realizing, from the polarizing influx of foreign media). Skipping exactly how such Influence may be placed in a country, we first explain how a player achieves Control within a country:  And Influence quite often means $$$ (Source: mangakakalot.com) Beginning with Bulgaria, we see that the U.S.S.R. has 3 Influence in the country in this case. Since this is equal to Bulgaria's Stability, the U.S.S.R. has Control over Bulgaria (this also applies if they have more Influence than required, i.e. 4 or more). More precisely, it is the net Influence that counts. Taking Hungary now, the U.S.S.R. has 4 Influence, while the U.S.A. has 1 Influence, making it 3 net Influence for the U.S.S.R. - still equal to (or greater than) Hungary's Stability, so the U.S.S.R. has Control over Hungary too. Coming to Yugoslavia, both superpowers have 3 Influence there for 0 net Influence for both sides, and thus neither player has Control in Yugoslavia. Since both players have Influence with Hungary and Yugoslavia, however, these two countries are deemed to exist within their "superpower space", while Romania and Bulgaria exists only within the U.S.S.R.'s superpower space, but not the U.S.A.'s (since the U.S.A. does not have any Influence within these countries). Turkey, Greece, Lebanon and Syria currently have no Influence from either superpower at all, and therefore lie within neither player's superpower space. It might be noted now that some countries have connections between each other, which are generally denoted by solid lines; for example, there are connections between Hungary & Romania, and Hungary & Yugoslavia, and Romania & Yugoslavia, but not between Romania/Yugoslavia & Bulgaria, despite their boxes being next to each other (supposedly reflecting geopolitical realities of the period). Countries with connections between them are considered to be adjacent in the context of the game, and the significance of this is that a player can only place Influence in countries within or adjacent to his superpower space, during a turn. For example, if the U.S.A. player desires to place Influence in Turkey, he will first have to place (at least one) Influence in Romania or Greece in his next turn, to be able to access Turkey in a future turn, following Domino Theory. Note that the solid red counters are simply a visual reminder that the U.S.S.R. has Control of Hungary and Bulgaria; were the U.S.A. to eventually place 1 Influence in Bulgaria, the U.S.S.R. would no longer Control Bulgaria, and the solid red "3" counter would be replaced by a white "3" counter with the number in red (as in Yugoslavia), despite their actual Influence in Bulgaria not changing. It is however costly to spread Influence in a country Controlled by an opponent via Operations (to be explained later); when that happens, a player would have to spend 2 Operations Points to place 1 Influence, while the country is still under Control by an opponent. However, once Control is broken (as in Yugoslavia for both players), succeeding spreads require only 1 Operations Point to place 1 additional Influence. 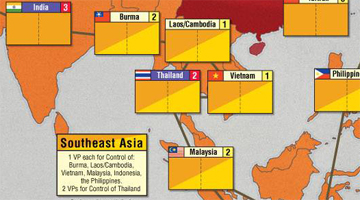 A Long March to Thailand This then implies that a player may have to take a large number of turns (more details about turns later), to place Influence where they want it. With reference to the full map, the U.S.S.R. would be expected to take six turns to get Influence into Thailand, placing it the "normal" way; either South Korea → Japan → Philippines → Indonesia → Malaysia → Thailand along the Pacific rim (with starting Influence in North Korea), or Afghanistan → Pakistan → India → (Burma → Laos/Cambodia)* → Thailand through South Asia. Clearly, this gives the opponent plenty of advance warning, as to what countries (and regions) a player is likely targeting. [*Already Team Red's in Cold War II, as we have seen.] At this point, one might have guessed that the objective is to Control as many countries as possible, and indeed, Controlling countries is generally a good idea. It is also however something of a secondary objective, with the ultimate goal being to win Cold War I by obtaining a net 20 Victory Points (VP) first, or failing that, to have more VP than the opponent, at the end of the game. VP are indeed usually won by Controlling countries, when their regions are scored. In the above example of Southeast Asia, 1VP is awarded for each SEA country Controlled, with Thailand worth 2VP instead. Note that Thailand's (and India's) Stability is in a red box, and not a yellow box; this identifies them as Battleground States, which have special (geopolitical) importance in assigning VP when scoring a region, and as such have some additional special rules regarding them. But back to the various regions first, it may be observed that the world has been divided into six regions (Europe, Asia, the Middle East, Africa, Central America and South America), with Europe and Asia further containing subregions (Western/Eastern Europe, and Southeast Asia). In the above figure, Thailand (and most of the other countries shown) are denoted as within Southeast Asia (and also Asia) by the diagonal dark-and-light yellow colour scheme of their main box, while India in contrast is in Asia, but not Southeast Asia, from its main box being fully in dark yellow. For Europe, Austria and Finland are special cases considered to be within both Western and Eastern Europe, and it can be noted that Canada, Greece and Turkey are considered to be in Western and not Eastern Europe, from their main political affiliation in the Cold War I period (and not as might otherwise be expected from geography) It should be noted that VP in Twilight Struggle is always relative, and recorded on a common Victory Point Track. The game starts with the VP Track marker at zero, and moves towards +20 (in the positive direction) whenever the U.S.A. earns (a net amount of) VP, and towards -20 (in the other direction) when the U.S.S.R.. does likewise. As the rulebook explains, if the VP marker is currently on the +10 space, and the U.S.S.R. gains 2 VP, the VP marker is moved to the +8 space. As previously stated, +20 (or more) is an instant win for the U.S.A. player, and -20 (or less) the same for the U.S.S.R. player. 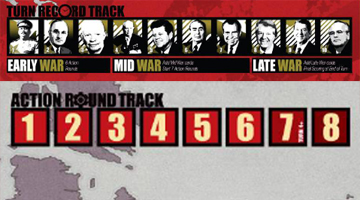 This may take some time Having explained how Influence is spread, and VP won through Controlling countries and regions, the natural next question would be: how much Influence can a player assign during his turn, and when does regional scoring take place. For this, the "turn" structure might first be discussed. A full game of Twilight Struggle comprises ten Turns (with a capital T), corresponding to the Early, Middle and Late periods of Cold War I:
Each Turn comprises 6 Action Rounds for each player in the Early War, and 7 Action Rounds in the Mid to Late War, which gives a total of 67 Action Rounds, over the full game. Each Action Round begins with the U.S.S.R. player having his phase (i.e. small-T "turn"), during which he can conduct Operations. This is followed by the U.S.A. player's phase, after which the next Action Round begins. Each big-T turn begins with a Headline Phase, in which events occur that set the tone for the rest of the Turn; and to explain the Events (and Operations), we will finally have to get to the cards. In Twilight Struggle, each player draws up to eight cards at the beginning of a Turn (increasing to nine cards from the Mid War onwards), which makes up his hand of cards. These cards are then what determines how many Operations a player can conduct during his phase in each Action Round, and what Events (including scoring regions for VP) can occur. Example follows: 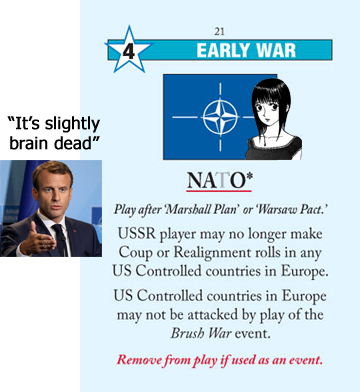 But we have the moral backing to Defend Democracy (sorta)! (Sources: bbc.com, twilightstrategy.com, myanimelist.com) Here we have the NA(T)O card, which has a Card I.D. of 21 (in fine print), belongs to the Early War, and is worth 4 Operations Points (number in the star at top left). The Event (and conditions) text is stated under the card name, and the asterix (and red reminder text) indicates that this card has to be removed from the game (and not added to the discard pile of cards), when the Event is played (which is usually specified for unique milestones from the real-life Cold War I). Since the star is in white, this is a U.S.A. card; U.S.S.R. cards will have the star in red, while neutral cards will have the star in both white and red. At the beginning of the game, only the Early War cards are shuffled and used, with Mid War and Late War cards shuffled into the draw deck only right before the corresponding periods (i.e. at the start of Turn 4 and 8 respectively); this ensures that Events (largely) happen about when they actually did. Let us assume that we are the U.S.A. player, and have NATO in our starting hand. This is usually welcome... but mostly for the 4 Operations Points that the card offers (explained later). During one's phase, a card belonging to one's alignment (or neutral card) may be used for only either its Operations Points, or its Event. Therefore, if we choose to play the NATO card for its Event, the U.S.S.R. player would thereafter not be able to perform Coups or Realignments in U.S.A. Controlled countries in Europe, for the rest of the game. However, if the enabling condition (Marshall Plan or Warsaw Pact previously played) does not apply, the Event would not actually take place, and the card would go to the discard pile (of course, in this case, the U.S.A. player would generally choose to use the card for Operations Points instead, but this may make sense for other cards) So let us say that we choose to use NATO for its 4 Operations Points (Ops). Then, these 4 Ops can be spent in three ways. Firstly, the most common use would be to place Influence markers in countries possibly to achieve Control, as previously explained. Returning to the Eastern European example, we could place any combination of 4 Influence in Yugoslavia, Greece, Romania or Austria (west of Hungary), or spend 2 Ops to obtain 1 Influence in Hungary (before possibly adding further Influence into it). For example, if we were determined to contest Hungary, we could first spend 2 Ops to have the Influence at 2-4, before spending the next 2 Ops to tie Influence at 4-4. Note that we cannot place Influence in Bulgaria, since we do not have Influence in a country adjacent to it (at the beginning of the current phase); to do so, we would have to place Influence in Greece, and wait for our next Action Round phase. 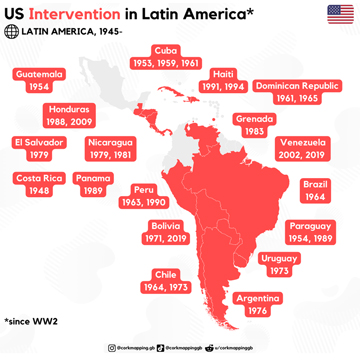 Very profitable if properly executed! (Source: r/TwilightStruggle) Here, it can be observed that the Twilight Struggle is indeed not primarily a military contest (as explained last month), but a "multifaceted game of strategy". Most of a superpower's gains will come not from wars (through a select few are represented as Events, e.g. Indo-Pakistani, Arab-Israeli, etc.), but from (largely) peaceful spreading of Influence, which abstracts foreign aid, bribery, blackmail, FAKE NEWS, etc. However, a more... direct approach may be warranted at times, which is where we get the second use of Operations Points: Coups. A Coup entails "operations short of full-scale war to change the composition of a target country's government", so reads the rulebook, and often happens when said target country gets uppity ideas of actually being independent (of course, such operations by rival superpowers are coups or insurrections, while ours are freedom revolutions or people power uprisings). Anyway, to conduct a Coup, a player first targets a country in which the opponent (but not necessarily himself) has some Influence in. Then, the player rolls the dice, adds the Ops value of the card being used, and subtracts twice the country's Stability from that total. If the dice roll plus Ops value minus twice Stability is positive, the Coup was successful, and the difference is removed from the opponent's Influence, with one's own Influence added if that proves insufficient. 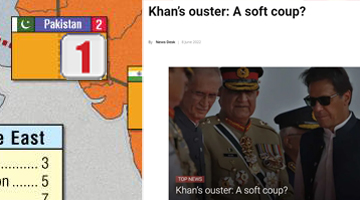 It's a constitutionally mandated vote of no-confidence, okay? (Source: globalvillagespace.com) Using recent events in the Battleground State of Pakistan as an example, we have Team Red with one Influence Point there, with trust from Team Blue having sunk to new lows after the Osama bin Laden embarassment. An irritated Team Blue arranges a Coup attempt with the 4 Ops from NATO, and rolls a 2 (too much FAKE NEWS has severly diminished their prestige). This gives a modified dice roll of 4+2=6, which after subtracting twice Pakistan's Stability of 2, leaves us with 2. The Coup succeeds, Team Red's 1 Influence is removed, and replaced with 1 Influence from Team Blue, leaving them not quite in Control; Prime Minister Imran Khan may be out for now, but his popularity appears very real, and he isn't taking his ouster lying down... maybe Team Red will play some Influence back in - or perform a counter-Coup - soon? Here, it might be realized that a country's "defence" from Coups relies purely on its intrinsic Stability, and is independent of how much Influence has been placed in that country (even if it is Controlled). This has interesting implications when targeting 1-Stability countries that are currently Controlled by the other superpower. In particular, relatively "honest" spreading of Influence though Ops with a 2-Ops card would only get the player to a 1-1 Influence tie. However, if a Coup is declared instead, the worst-case dice roll of 1 would still yield a positive score of 2+1=3, which would remove the opponent's Influence from the country; a roll of 2 or more would further add one's own Influence, to a whopping 5 Influence points on a roll of 6. This then implies that it is generally rather more attractive to Coup 1-Stability banana republics/tinpot dictatorships/random African states, then to try and spread Influence honestly into them, which one figures is not an accident in game design. The flip side, however, is that the same applies to one's opponents, who can freely execute his own revenge Coups for similar potential huge Influence swings. At the other end of the spectrum, the United Kingdom is essentially un-Coupable with a Stability of 5, given that the maximum Ops from a card (4) plus the best possible dice roll (6) is only equal to twice that value; the U.S.A. and U.S.S.R. are assumed invulnerable to each others' Influence, and thus do not have Stability/Influence boxes. The third and final (and probably least-common) use of Ops, after Influence Spread and Coups, is Realignment. If this option is chosen, the player makes one Realignment roll for each Ops, so NATO would provide 4 Realignment rolls. For each such roll targeting a country, each player rolls a dice, and the difference in values is removed from the Influence of the losing party (if any). Each player's roll has 1 added to it if they have more Influence in the country before the roll, and for each adjacent Controlled country (including the superpower itself). Note that no Influence is ever added through Realignment, and also that it is entirely possible to (fully) lose one's own Influence in the target country, given some unlucky rolls (not possible in Coups)! 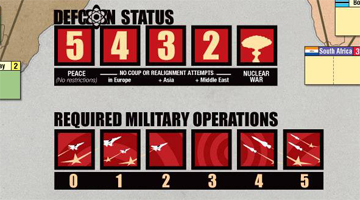 It is 100 seconds to midnight, and the clock's running fast Given the raw power of Coups (and to a lesser extent Realignments, especially to the currently-behind superpower), including their ability to directly access regions and countries that would otherwise take much slow and painstaking Influence spreading, there has to be a mechanism preventing the players from simply Coup-ing each others' vassals willy-nilly, and this is implemented through DEFCON Status. Basically, Coups and Realignments are recognized to be aggressive acts in The Greatest Game, and the superpowers thus tend to maintain a masquerade as to how many such "accidents" are acceptable. The game starts with DEFCON at 5, which represents peace (or as much of it as is believable in Cold War I, anyhow). At DEFCON 5, everybody's kinda complacent, and Coups/Realignments can take place anywhere. Coups in Battleground States however are deemed to attract (temporary) international alarm, and degrade DEFCON by 1. As DEFCON falls, the global community gets increasingly on edge, which limits the regions where the superpowers can meddle freely. At DEFCON 4, no Coups/Realignments are allowed anywhere in Europe; at DEFCON 3, this extends to Asia, and at DEFCON 2, to the Middle East. If a player causes DEFCON to degrade to 1 during his phase, he is deemed to be responsible for triggering Mutual Assured Destruction (MAD), and loses the game. Despite this, both superpowers are ironically expected by their allies to bare their teeth every now and then (alluding to brinksmanship), which is represented by the accompanying Required Military Operations track. Each player generally advances their counter along this track during a Turn by Coup-ing (though some war-based Events also count), with the number of Ops spent in the Coup (even if it failed) being the number of spaces that his marker moves on this track. Following the previous example, the U.S.A.'s Coup of Pakistan relied on the 4-Ops NATO card, which allows them to move their marker to the fourth space on the track for this Turn. Then, at the end of the Turn, if a player's marker position on the track is lower than the current DEFCON, the player loses the difference in VP. For example, if the U.S.S.R. ends the Turn not having advanced his marker on this Required Military Operations track (for whatever reasons) with DEFCON at 4, he loses 4 VP. 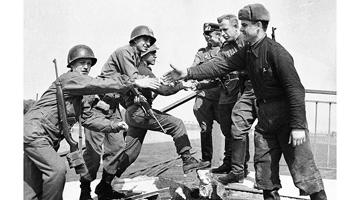 Well done, comrade! The Nazis are defeated! Coup a Third World country together next Saturday for sport? (Source: csmonitor.com) There's no real need for either player/superpower to fret, though, given that even the most-stringent DEFCON restrictions do not mention Central/South America or Africa; as such, any non-Battleground country in these regions that has enemy Influence is always fair game, which again reflects real life - did you know or care about the Coups in Burkina Faso, Chad, Guinea, Mali, Sudan, Niger and Guinea-Bissau happening these past couple of years? No? Yeah, thought so. And what about the Syrian war, still ongoing from 2011? Yeah, DEFCON wasn't at 2 then and it isn't a Battleground State, nobody really bothers nowadays, as Ukraine may be taking as a warning. Hopefully, all this sounds exciting enough already, but there's more! Despite the encouragement of Coups by Required Military Operations, DEFCON restrictions do mean that Coups are generally untenable in the more-valuable regions (Europe and Asia) after awhile, with DEFCON often getting maintained at 2 through most of a game, despite increasing by 1 at the beginning of each Turn. As such, most cards would tend to be played for Influence spread. However, remember that since players draw cards from a common deck, they can get (possibly the majority of their) cards belonging to the other superpower in their hand. In such cases, it seems particularly obvious that such cards would always be played for Operations Points, rather than an Event benefiting the opponent... but there's a catch. When playing such cards for Ops, the Event occurs too, and the opponent resolves the Event as if he played it himself. This is probably the defining mechanic of Twilight Struggle, and what has made it such a fiendish exercise in making tough decisions/trade-offs, and crisis management. Many a player has probably at one time had his hand filled with his opponents' cards, and agonized over how to minimize the damage represented. This might be the U.S.A. player having to decide how to handle the Berlin Blockade, a North Korean invasion and the Suez Crisis all within a timeframe of a few years (a Turn), or the U.S.S.R. having to sweat on the Falklands, America's Strategic Defense Initiative (Star Wars) and the Chernobyl disaster together at once. The adversary's Events occuring on one's play, then, reflects the nature of many of these challenges being unavoidable; all the player - even one as mighty as the U.S.A. or U.S.S.R. - can do, is to try and manage the timing and order in which they are addressed, to an extent. 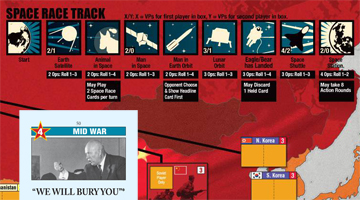 Ugh, don't wanna deal with Khrushchev now, let's just send him to space? (common Twilight Struggle lingo) It goes without saying, then, that an intimate acquaintance with the cards (and their specific Events), confers a huge advantage in gameplay. Careless novices might try to build Influence in France early on as the U.S.A., only to get blindsided by De Gaulle Leads France (reflecting the French leader's pulling the plug on NATO), or ambitiously try to steal Japan as the U.S.S.R., only to get all their investment in the country wiped at a stroke by US/Japan Mutual Defense Pact (this is not to say that it is impossible for the U.S.S.R. to get Influence into - or even Control - Japan, but they would usually be well-served to wait until this particular Event is played, before trying) Careful readers might have noticed that the players' hand size (8 cards up to Round 3, then 9 cards from Round 4 onwards) happens to be exactly one more than the number of cards they are expected to use in each Turn (one per Action Round, plus one for the Headline Phase at the beginning of a Turn). This means that a player can avoid playing one particularly-disadvantageous card, by carrying it to the next Turn. Moreover, there are a few more ways to relieve oneself of unwanted cards/Events; the most reliable would be the Space Race (track shown above). Once every Turn, a player may expend a card on the Space Race during an Action Round phase, for a chance to advance his marker on the Space Race Track for (minor) VP and in-game advantages. Cards used this way never have their Event executed, and go to the discard pile. However, it should be noted that this is generally an inefficient use of cards (as opposed to Influence spread/Coups), in higher-level play. It's probably the right time to cover The China Card here too, which is a special neutral card worth 4 Ops that the U.S.S.R. begins the game with. This card abstracts the role of China in Cold War I, as perhaps the most-consequential (and nominally-independent) player, after the Big Two superpowers. Its big Ops value (with a bonus for full deployment in Asia) is always welcome, but of perhaps greater significance is that it is not considered part of one's hand, i.e. the U.S.S.R. starts with a hand of 8 cards and The China Card. This means that the holder of the card can essentially avoid playing yet another undesirable card in a Turn, by using The China Card instead. However, the catch is that once played, The China Card immediately goes to the opponent (if face down and unusable until the next Turn), in a nod to China's playing both sides in Cold War I. 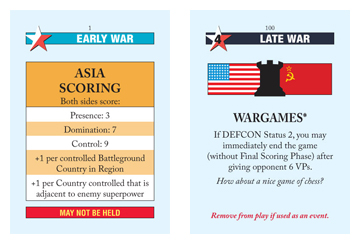 How I Learned To Love The Score (also riffed on with another card) We should perhaps round out the remaining more-special cards now (serious players should of course carefully study the full card list, as thoughtfully commentated on at the Twilight Strategy fansite). Scoring Cards exist and are shuffled/dealt out from the deck alongside normal cards, and are neutral cards with no Ops that thus must be used for their Event (i.e. awarding VP for their respective region), and may not be held to the next Turn. As so often the case in Twilight Struggle, this presents a dilemma to the player holding Scoring Card(s). On one hand, they are the key to gaining VP towards the primary victory condition, and they can spend the bulk of the Turn setting up their position in the appropriate region(s), to maximize their score from the card. On the other hand, playing a Scoring Card is otherwise a wasted Action Round phase, and is especially painful when there are no prospects for the player to improve his position in that region at short notice. Other than Plus/minus 20 VP, VP scoring for all regions at the end of Turn 10, and DEFCON to 1, there is one final victory condition of note - the Wargames card (referencing the movie). A neutral Late War card that can only enter the game from Turn 8, Wargames essentially wins the game instantly for a player with a net VP lead of 7 or more, as long as DEFCON Status is at 2 (which is quite common). Clearly, this can be quite unexpected - and a sore way to lose - for newbies, which is why some veterans recommend leaving the card out of the game, until everybody gets up to speed. Finally, returning to the DEFCON 1 loss/victory condition, it should be noted that more-cunning players can plan to force their opponent into so-called DEFCON suicide, by leaving the opponent with no option but to play a card that will degrade DEFCON, with DEFCON already at 2. This generally involves attacking the opponent's hand by forcing him to discard card(s) via Events, which in turn prevents him from holding dangerous DEFCON-degrading cards to the next Turn. While obvious DEFCON degraders (i.e. those that clearly state "Degrade DEFCON" or "Set DEFCON" in the Event text) may be easy to avoid, it should be noted that a number of other (opponent) cards/Events allow actions (usually Coups) to the same effect. Worse, two of these - CIA Created and Lone Gunman - pose special headaches for the U.S.S.R. and U.S.A. respectively, since they have only 1 Ops, and thus cannot be spent on the Space Race. As JFK apparently did not realize, the CIA's trouble. 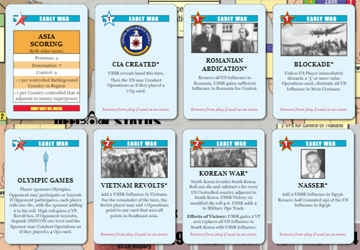 Welp, not a good time to be the U.S.A. player (Original source: r/TwilightStruggle) While that about describes the gameplay, there's perhaps no substitute for actually trying out a few matches with an experienced player or the computer, to get a feel for Twilight Struggle. By design, the game is (slightly) biased towards the U.S.S.R. initially, before swinging towards the U.S.A. in the Late War period, and thus the expected flow between players of roughly-matched skill and luck would be for the U.S.A. player to try and weather the storm and not lose straight out to -20 VP or yield a hopeless board position in the first few turns, before staging a comeback as his more-powerful cards and Events enter play. As for the details, the Twilight Strategy fansite is hard to beat. The minutae can get very dense once one really gets deep into the game, all the way to the optimal initial assignment of Influence, for instance by top Chinese players (who seem to make up a good proportion of the pros, for whatever reason); perhaps someone will sic AlphaZero on the game sometime. For all that, it should be recognized that Twilight Struggle is hardly a pure strategy game; luck can play a big part, both in the card draws and dice rolls. About card draws, while it is sometimes claimed that the cards tend to eventually balance out - since if one is drawing many opposition cards (and thus playing their Events for them), the opponent should be drawing more of one's cards too - this is far from certain. Some hands (such as shown above) are simply objectively bad; other than having many cards of the opponent, the available Ops values are also low - and given that Ops value determines the amount of Influence available to spread, it can be easily understood as to how several consecutive hands with low Ops value totals can severely cripple one's board position, before considering unlucky dice rolls (for Coups, Space Race etc.) on top of that. Returning to reality, our Defence Minister has commented in his closing speech at the Shangri-La Dialogue that "...Security alliances are hardening. Despite protestations and caveats to the contrary, partners are positioning and building up security arrangements, if not military capability, among their groupings", and also that "Whether [ASEAN states not being compelled by the U.S.A. and China to pick sides] is the reality ...only the facts will speak for themselves", so my personal reading is that the absolute jiao wei being flung about is becoming a bit too much to take. Here's to hoping that the DEFCON Status-equivalent stays about 3 for now, then. 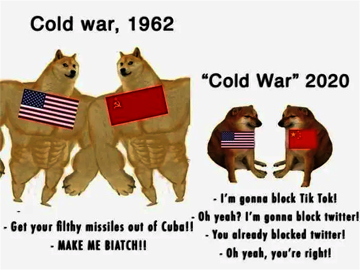 That's it, I'm telling mommy and blocking YouTube! (Source: 9gag.com) Next: Goodbye, Grandma
|
|||||||
 Copyright © 2006-2025 GLYS. All Rights Reserved. |
|||||||